How To Evenly Space Views in SwiftUI
4 different ways to position views
The other day, I was getting back into SwiftUI development after being stuck on an UIKit project for months. Strangely, it took me a while to compose the most basic of prototypes: spacing two images evenly in my image-filtering SwiftUI application.
I tried setting resizable() and aspectRatio() modifiers on the two Images in my HStack, but no luck. In fact, since the actual image asset was so large, one of them actually filled the entire screen. Of course, you can always hardcode the width and height, but then it doesn’t work on all screen sizes and orientations.
Now that I’ve gotten a hang of SwiftUI after a while, I’m excited to share a few different techniques to space your views in SwiftUI. Let’s get started.
Use Spacers, Stack Spacing, and Alignment
As the name suggests, Spacers occupy the available space. The manner in which they fill up space depends on whether they’re wrapped within an HStack or VStack.
Here’s a simple example:
VStack {
Image(systemName: "shield.fill")
Spacer()
}
As you can see, the Spacer occupies the available space vertically. The first Spacer pushes the Image to the top of the screen. To make all the views equally spaced, add a Spacer() between each of them.
We can also add spacing inside Stacks and align the views in a certain manner. Even better, we can use Stack spacing and Spacers in combination to bring more flexibility in the arrangement of views.
For instance, in the code below, we’ve used a Spacer to align the HStack towards the left of the screen. Plus, we’ve also used Stack spacing and alignment to arrange the SwiftUI Text:

Now, what would happen if we placed another Spacer() between the two Text views? Would it occupy the entire screen space or just the available height of the HStack?
Answer: Since we haven’t specified a height for the HStack, it’ll actually occupy the entire screen space. To ensure that the VStack doesn’t take space beyond the HStack, we can set a fixed frame height.
Using Shapes
While we’ve already seen how Texts and Images in SwiftUI only occupy the content space, Shapes, on the other hand, expand to cover as much space as possible.
So, to fill the available space of a stack or perhaps to equally space our views, we can place them inside a Shape view.
Here’s an example:

Shapes are a decent way of filling up space equally. You can quickly create custom cell-like views by using them too.
Instead of using the overlay view modifier to place the child view, you can also use a ZStack.
With the Frame Modifier
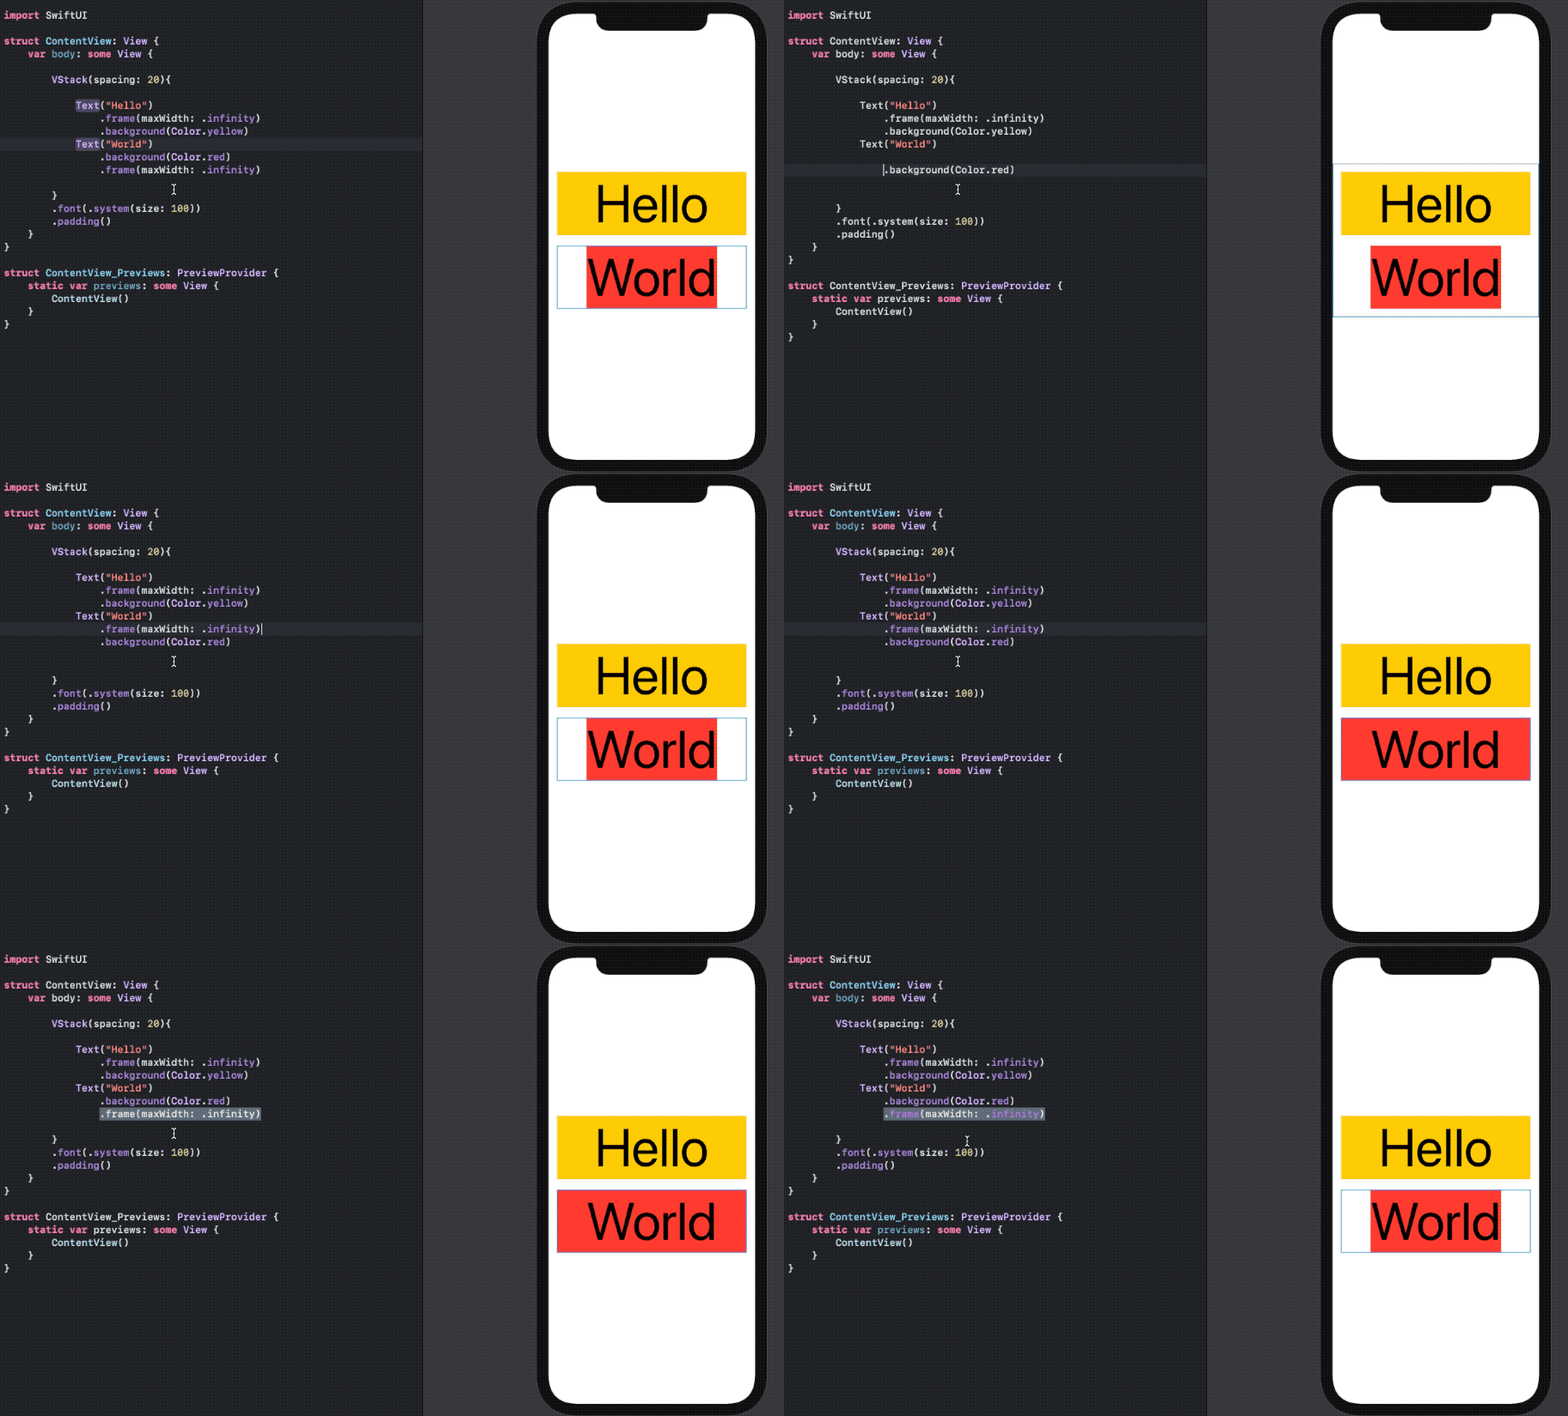
Often, we want to create views of equal width or height. In such cases, using a frame modifier with maxWidth or maxHeight set as .infinity is generally the preferred way of forcing the width and height to be the maximum available space.
Here’s an example of the frame layout modifier in action:

Note: Setting the background modifier before the frame causes the VStack to still have some space. This is because the background modifier is applied to the frame’s view and not the whole stack. Hence it’s crucial to order the view modifiers correctly.
Using Grids
While the three ways above are sufficient to space views in any manner, often when there are too many views to arrange, using a Spacer or a frame modifier can lead to some boilerplate code.
Thankfully, in such scenarios, we can leverage SwiftUI’s LazyVGrid and LazyHGrid, which were introduced with iOS 14.

In the code above, each of the Texts wrapped within the SwiftUI Group has the same width thanks to the horizontal grid item that we’ve created.
Conclusion
In this article, we saw four different ways of managing spaces between views. Evenly spacing views is a fairly common requirement when composing views. Now you know when to use which of these techniques.
That’s it for this one. Thanks for reading.

